This guide is for your Bitbucket Server/Atlassian Stash admin to set up FOSSA On-Prem's access to your internal code. Note: This was written for Bitbucket Server v4.0.6+
You first need to add an application link so that users with a login on Bitbucket Server can view their projects through FOSSA.
Navigate to your local Bitbucket Server > Settings > Application Links.
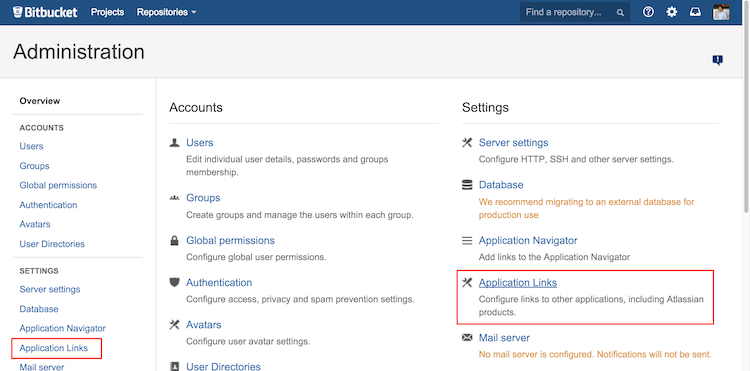
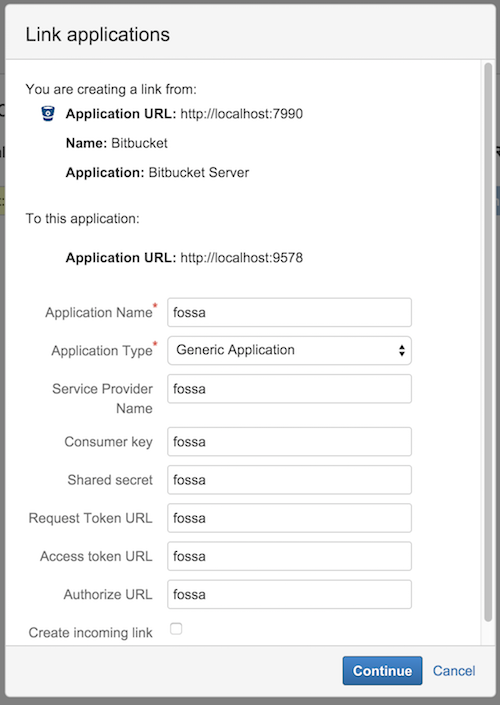
Create an Application Link to FOSSA's internal IP

Fill in "fossa" for all options:
Go to the new link and Edit > Incoming Authentication

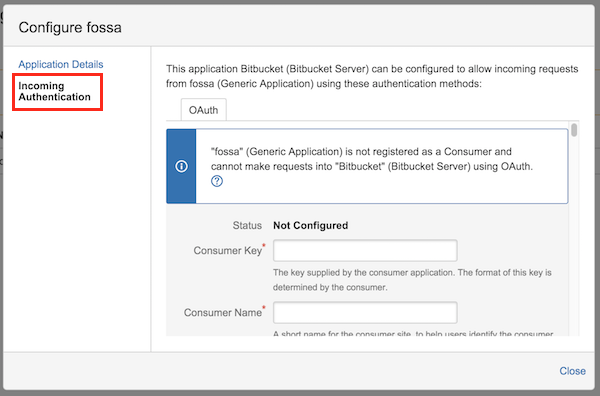
Fill in the following settings and hit "Save" (leaving the rest blank):
Consumer Key: fossa
Consumer Name: fossa
Public Key:
MIGfMA0GCSqGSIb3DQEBAQUAA4GNADCBiQKBgQCqGKukO1De7zhZj6+H0qtjTkVxwTCpvKe4eCZ0FPqri0cb2JZfXJ/DgYSF6vUpwmJG8wVQZKjeGcjDOL5UlsuusFncCzWBQ7RKNUSesmQRMSGkVb1/3j+skZ6UtW+5u09lHNsj6tQ51s1SPrCBkedbNf0Tp0GbMJDyR4e9T04ZZwIDAQAB
Now users can successfully connect their Bitbucket Server accounts with FOSSA.
FOSSA currently requires a companion bot account on your Bitbucket Server instance with global read access to analyze all internal repositories. This will be replaced in future updates, but is currently required for FOSSA to fetch code.
Add fossabot user to Bitbucket Server
Go to Settings > Accounts > Users > Create User.

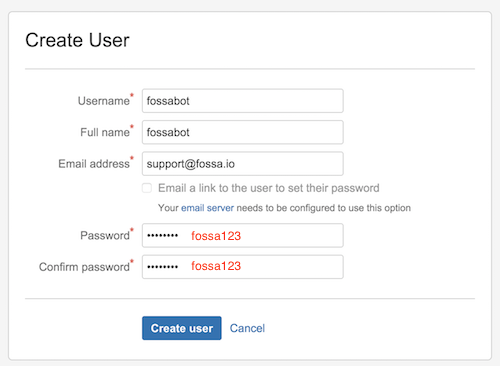
For username/password, use the bitbucket_server__credentials config in FOSSA's config.env (default below):
bitbucket_server__credentials__basic__username=fossabot
bitbucket_server__credentials__basic__password=fossa123
Ensure fossabot has global read access
fossabot needs to be able to clone any repository in your instance of Bitbucket Server. The easiest way of doing this is giving the account admin privelages in Settings > Accounts > Global Permissions:

If you need to custom-configure a role for fossabot, make sure the account still has global read afterwards (i.e. try cloning repos across different projects as fossabot).
Now you should be all set up! Users on FOSSA should be able browse and import their repositories on Bitbucket Server through Bulk Import.
NOTE: fossabot is not accessible to average users of FOSSA, but serves as an internal proxy for FOSSA to fetch code. Normal users will only be able to browse and import what they have access to normally through Bitbucket Server.
If you've set up this configuration before installing FOSSA, you can ignore this step and use the default setup.sh prompts to complete the FOSSA install.
Otherwise, ensure your config.env file on your FOSSA box has the following entries:
# Replace with your Bitbucket base URL, including protocol
bitbucket_server__base_url={$BITBUCKET_BASE_URL}
bitbucket_server__credentials__oauth2__client_id=fossa
bitbucket_server__credentials__basic__username=fossabot
bitbucket_server__credentials__basic__password=fossa123
After importing, automatic updates need to be configured manually in two places for each imported project.
On FOSSA via Project > Settings > Update Hooks, select "Select Update Method...", choose Webhook and hit Save Changes.
On Bitbucket Server, install (if not done already) the webhooks module and enable them on each imported project. View guide here.
Copy & Paste Webhook Update URL from the first step to the webhooks in Bitbucket under Post-Receive Webhooks > Enable.
If you have any problems, contact support at support@fossa.io. This guide was written for Bitbucket Server v4.0.6+.
About us
We're starting by turning open source license compliance into what it should be — simple, accessible.
Learn more
Office
351 9th Street
Suite #300
San Francisco, CA 94103

