This document will tell you all you need to know about how FOSSA's issue scanner works.
After a project has been added and built by FOSSA it is able to be scanned for issues. This can be done either manually via the Project Summary page, or will be done automatically by FOSSA.
FOSSA will only scan revisions for issues automatically if they meet the following criteria:
NOTE: By default, when a project is added to FOSSA, it selects one branch to be the tracking branch. This is set to either "master", "trunk", or the first branch FOSSA finds. Tracking branches can also be manually added/removed via the Project Summary page:
![]()
This will be reported if FOSSA finds any dependencies that have no license associated with them.
This will be reported if FOSSA finds any licenses in your project that are marked as DENY in the projects Policy
This will be reported if FOSSA finds any licenses in your project that are marked as FLAG in the projects Policy
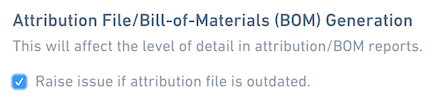
This will be reported if FOSSA finds either an outdated attribution file, or doesn't find one at all. By default, scanning for this is turned off.
To turn this on, Go to Project > Settings > Issue scanners and check Raise issue if attribution file is outdated:
Several factors go into issue scans, one of the biggest being the Scanner Detail Settings. This is found under the Project Settings tab: (Project > Settings > Issue scanners)
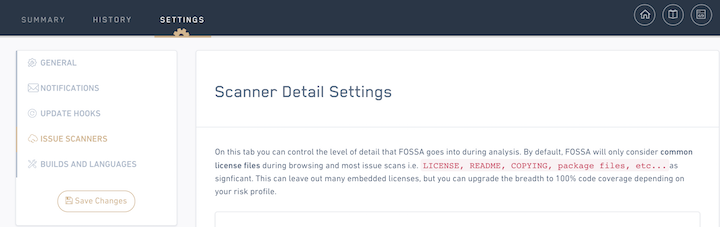
On this page, scan details are configured for four different categories. For each of these, two factors go into issue scans: Level of Detail and File Coverage Detail.
Level of detail refers to how deep in the dependency tree FOSSA will look. For only direct dependencies, depth would be 1. For direct dependencies and their dependencies, depth would be 2, etc.
By default, Fossa offers three quick settings to set Level of detail:
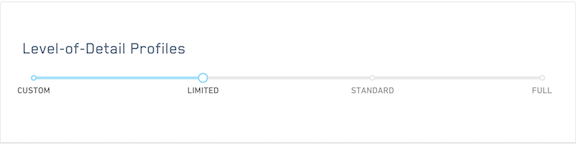
Level of detail can also be customized further for each scan category:

Each section has two options for file coverage, Common License Files or 100% Code Coverage:
Common License Files
This option tells FOSSA to only consider common license files i.e LICENSE, README, COPYING, package files, etc...
100 Code Coverage
This will scan every file in the project for license information. This will find any embedded licenses in files that were left out of the Common License Files.

There are four scan detail settings to customize.
Default & Browsing UI
This sets the depth and file coverage for most areas of the FOSSA UI, reporting, etc.
Unlicensed Dependency Scanner
This sets the depth and file coverage for scanning for an unlicensed dependency. If set to Common License Files, the scan results will be a little more noisy, so for Limited and Standard Level of Detail, this is set to 100% Code Coverage.
Policy Conflict Scanner
This sets the depth and file coverage for policy checks. For information on policies, view the Policy Documentation
Attribution File/Bill-of-Materials (BOM) Generation
This sets the depth and file coverage for Attribution files
If issues are found, you can take action on them by navigating to the Project Summary page, and clicking Review & Fix:

For each type of issue found, FOSSA allows you to simply ignore the issue, or resolve it. The way to resolve issues varies by the type of issue:
You can create a JIRA ticket from this screen as well.
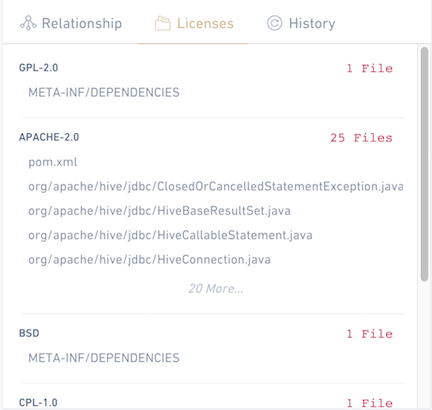
When selecting a license or dependency, you may view the paths to this dep in the code:
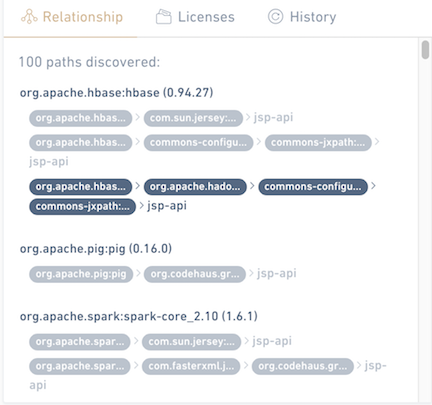
the licenses associated with it:
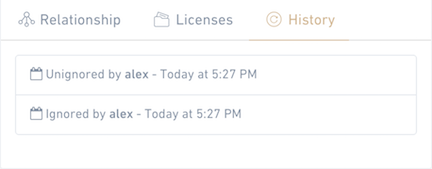
and the issue change history:
About us
We're starting by turning open source license compliance into what it should be — simple, accessible.
Learn more
Office
351 9th Street
Suite #300
San Francisco, CA 94103

